Installing Quarter Round Moldings
When installing quarterly round moldings, I consider it as a frame around your laminate or hardwood flooring as a frame around a piece of art, so the better it is done the better your floors will look.

The Different Types of Quarter Round
There are many different types of quarter round. The most common type is wood. I usually get the first quarter round from Home Depot. The cost is about .60 cents a foot. You can also purchase only quarterback with no joints so that it can be stained (this is quarter quarter round and may cost a little more). There is also a plastic quarter round . The plastic quarter round is brittle and can break easy. And when nailing the plastic quarter round it can sometimes shatter, I know this from experience.
There is a foam type which is flimsy. The foam type is a plastic type and will melt when cut with a miter saw. The best thing to do is to make your cuts quick so it doesn't heat up and melt it. Another type is made ofcompressed fiber with a covering that has different patterns on it that resemble wood. The compressed fiber type seems to be a bit harder on blades for some reason, so use a sharp blade when cutting it to get the cleanest look.
(Click on photos to enlarge)
Installing quarterly round moldings is a task that can be used to install laminate or hardwood flooring. It can be confusing trying to cut all the angles you may encounter. I will try to explain it in simple terms so you can install your own quarter round.
The purpose of installing the quarter round is to cover the expansion gap around the walls. You can also cover the gap with base board. Most likely you will be installing the quarterly round up against the existing base board.
When installing quarterly round moldings, it typically measures 3/4 by 3/4 inch in width, although the sizes will vary, sometimes it may be less than 1/2 inch. NOTE: When installing your laminate make sure you have a piece of the quarter round on hand to check the gap so you will know the gap will be covered.
It also comes in lengths of 8 feet up to 16 feet. The 16 footers mean you will have less joints but it can be a little more difficult to measure, and even trying to get it in your home may be difficult if you have a lot of turns.
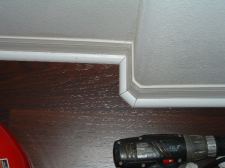
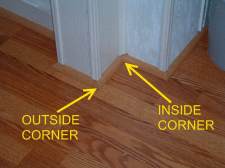
Basically when installing quarterly round moldings you will encounter two different types of angles. The inside corner and the outside corner. Both of these corners are 90 degree, which means in order for the 1/4 round to fit together with a tight fit you will cut each side at 45 degrees.
Sometimes the corners are not exactly 90 degrees. In this case I will use an example of the outside corner being a 92 degree angle. When cutting the quarter round you will have to cut each side at 46 degrees so it will fit tight together. I will mention here that if you are installing 1/4 round the small gaps can be filled with some caulking. If you are installing a wood grain 1/4 round use and matching putty to fill the gaps.
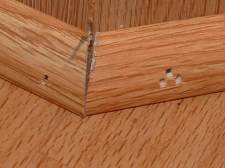
I took the opportunity when I was working in a home to take a picture of the 1/4 round a previous installer. He didn't cut the angle properly as seen in this photo. And didn't bother to even use some putty to hide it.
These small details can affect the overall look of your finished floors.
Tools Needed
Cutting Quarter Round
The easiest way to cut the quarter round is with a miter chop saw. Most people have one of these or know where to borrow one. They can be purchased for around $ 100.00. The chop saws usually have the angles preset on the saw so there is no guessing at the proper angle.
The most common are used when cutting quarter rounds are 45 degrees and 22.5 degrees.
It's best to use a sharp carbide tip blade for good clean cuts. A dull blade will make rough cuts which will result in a bad looking joint.
If you are able to get a chop saw, there is the old fashion way of cutting by hand with a miter box. This will take quite a bit more time and will not give you the accuracy of the chop.
Installing The Quarter Round
The easiest method for installing quarterly round molding is to use a nail gun which requires a compressor. If you are installing a lot of quarterly, buying a nail gun and compressor is not too expensive. You can get a combo set from 150.00 to 300.00 dollars.
Nail guns from Home depot and Lowes have had brand names and had problems with them. I finally purchased a 18 gauge nail gun from Sears (Craftsman) and had no problems. I have used a Senco nail gun for years and have had no complaints. I have also used a Paslode which is self contained, which means you do not have to have a compressor. The Paslode uses a rechargeable battery and c02 cartridges to shoot the nails. It is reliable although the upfront cost is expensive.
When nailing with a nail gun apply pressure to the 1/4 round at a 45 degree angle where the nail is going and push the 1/4 round down tight to the floor, so the 1/4 round is tight to the floor when you pull the trigger. Floors are not always flat, the good thing about 1/4 round is its flexible enough to follow the contour of the floor.
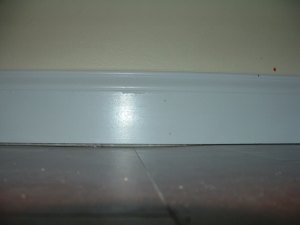
In some cases if the base board is installed on a new laminate or hardwood floor that isn't flat, there will be gaps under the base board that take away from the overall look of the finished floors. The base board could be described as following the contour of the floor, but there are times when this is not the case. This base board was installed by another installer that must have worked at a lower rate. So installing quarterly round molding can be used to cover this unsightly gap. In this case I don't think they installed 1/4 round to cover this gap.
I like to use nails in the gun that are as thin as possible. 18 gauge are a good size to use. 15 gauge nails are larger nail which may be good for nailing a bigger base board.
You could use a hammer and finish nails if you do not have access to a nail gun. If you use this method you can get to the counter when you download it so you will be able to fill the holes with a matching putty.
Finishing Touches When Installing Quarter Round Moldings
There are a couple of other tools I use to add the finishing touches to the completed look of the floor.
This is the process of caulking in the quarterly round. I use a small tipped flat screw driver, I prefer a long one about 8 inches in length, a clean rag (I buy a bundle at home depot for about 7 dollars) and some good adhesive caulking.
I use the screw driver with the law to clean the corners after I apply the caulk. You can't clean it all out with your finger. The adhesive caulk is also a glue which helps to attach small sections of 1/4 round that are too small for nailing and also for gluing in returns. (I will talk about returns as well)
When caulking the 1/4 round, run a small bead along the top of the 1/4 round as well as filling in the nail holes. Run your finger along the top to push the caulk into the space. Use the wet rag (not dripping law) to wipe down the 1/4 round. This can take some time to make it a huge difference.
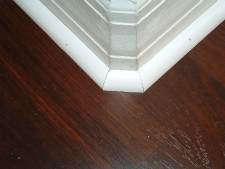
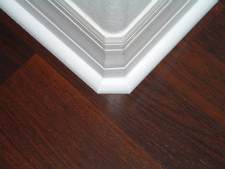
As you can see in these two photos the difference it makes after you chalk in the quarter round. The top photo is the BEFORE and the bottom is the AFTER photo. (click on photos to enlarge)
Ask Your Questions About Your Quarter Round or Leave Your Comments
If you have any questions or comments about quarter round, feel free to ask a question or leave a comment. I will answer questions to the best of my ability.
What Other Visitors Have Said
Click below to see contributions from other visitors to this page...
Outside 45 


How do you cut for an outside angle of 45? I did inside 45 by cutting the quarter rounds at 22.5 but can't figure out how to do the outside 45.
Quarter Round Nails through the floor? 


Thanks for your very informative site. I was wondering if there is a concern when nailing quarter-round, of the nails penetrating the floating floor and …
Installing Composite Quarter Round on Abutting a Bathroom Tub? 


Bathroom has linoleum that is curling and pulling away from the walls. The linoleum itself is not in bad shape, just the edges where it was never properly …
Glueing 3/4" quarter round against base board 


Q- This which is a common approach for DIY projects is not well explained. Nail guns, nailing and counter sinking and patching holes is not a straight …
Do You Nail To The Baseboard Or To The Floor? Not rated yet
Hi, great article!
(Q) I need to replace the quarter round after I pulled up the carpet. Does the quarter round nail to the baseboard, or to the floor? …
Here I will explain the angles that need to be cut for inside and outside corners.
Cutting Quarter Round Molding
Installing Quarter Round on Round Corners
Return to Home Page From Installation Quarter Round Moldings Page
| SEARCH THIS SITE
|
