Installing Laminate Tile Flooring
I do need to mention here that the laminate tile I am referring to in this segment is Quick Step 15 1/2 by 15 1/2 inches square. This particular brand has the Uniclic locking system which makes it easier to install. Other brands of laminate tile may or may not be be as easy as Quick Step to install, depending on their locking system.
Some laminate tile flooring is made in planks that can be as big as 16 by 48 inches in size. This can make it more difficult to install.
Most of the laminate tile I have installed were mostly in kitchens, bathrooms, hallways, laundry rooms and dining rooms. These smaller areas are easier to install the smaller laminate tiles.
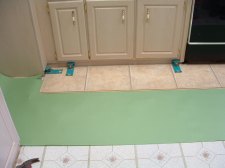
Installing laminate tile flooring is not quite the same as installing laminate planks. Laminate tile is not randomly installed. Installing it in a grid pattern or a staggered pattern requires precise placement of each tile. The photo (above left) shows the kitchen before I started the installation. The laminate tiles are going to cover the old floor (peel and stick tiles). The peel and stick tiles were installed in a grid pattern.
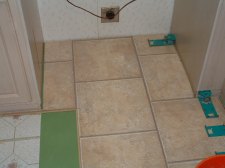
The photo (above right) is after I installed the laminate tile floor. I installed it in a stagger pattern. I prefer to install laminate tiles in a stagger pattern as it makes the floor stronger. When installing laminate tile flooring in a grid pattern you end up having four corners all at the same place. Installing in the grid pattern also is more difficult because the rows have to stay perfectly lined up both the length and the width. This can be hard to do when your constantly tapping the tiles together.
In this photo I am starting the first row of laminate tile in front of the sink in the kitchen. This is more of a focal point. I connected a full row of tiles from this starting point to the opposite end where the floor ends to make sure it didn't have a small sliver there. I try not to end the floor with a sliver (narrow piece of tile).
In this photo you can see the last tile in the first row is almost a full tile. So I will start my first row this way. If the laminate tile is flowing into other areas you may end up with small pieces where the floor ends. I try to lay the floor where the full tiles are most visible.
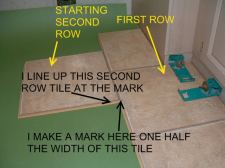
Here I am starting the second row of laminate tile. When installing the tile in a stagger pattern I measure the width of the tile. I then divide it in half and make a mark there. This tile measured 15 1/2 inches wide, so I make a mark at 7 3/4 inch. I line the first tile in the second row up to this mark and lock it in.
After installing the first tile in the second row, I continue this row to the wall before I proceed any further on the second row. I use my adjustable spacers to maintain the gap along the walls. These adjustable spacers in this photo are made by Pergo. You will most likely be using the little plastic spacers.
Installing as much as I do the adjustable Pergo spacers makes my job much easier.
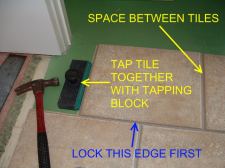
The Uniclic locking system on this Quick Step tile allows the tiles to be tapped together laying flat on the floor. As you can see in this photo. First I connect the tile on one edge which leaves a space on the other edge to be connected. Use a tapping block I tap the two together.
Return to Laminate Tile Page From Installing Laminate Tile Flooring Page
| SEARCH THIS SITE
|


