Floor Preparation, Not Always The Fun Part But It Has To Be Done
Which Direction Should I Lay The Flooring?
Floor preparation, knowing where to start is the first thing I need to know. So I ask my customer, Mrs Smith have you considered the direction you want your floor to go? She may have a preference or she may not. Knowing which direction the floor is going to lay will determine where you will start your floor preparation.
The floor can go either way, front to back or side to side. What I usually tell my customers is, it looks better to run it the long way, which is the longest stretch of room. It seems to be more pleasing to the eye and it makes the room appear longer.

Installing the laminate floors perpendicular to a light source (such as sliding glass doors or a large window) also tends give the floor a pleasing look.
On the other hand you may like it looking across the floor rather then down the length of it.
Once you decide, we can figure out where to start with the flooring. If your not living in the home you can start where it is easier for you.
If you do live in the home chances are you may be doing your floors on weekends. So you may not complete it as soon as you would like to.
You may want to start in the living room and work up to where the hall starts. Then you can start on the hall the next day.
If I'm installing floors in a home that is occupied and
has a pretty good amount of furniture, I will move furniture
to one side so half the room is cleared.
Then I remove the carpet as I proceed.
Carpet & Tackstrip Removal, How I Do It
Over the years I have removed multiple thousands of square yards of carpet. Unfortunately floor preparation includes doing this. So I've learned to do it the easiest and the most efficient way.
What I use is a carpet razor knife, I cut the carpet in about 3 foot widths the length of the room and just roll them up. This makes it much easier to carry and in some cases to dispose of. A tip when cutting the old carpet, cutting it on the back side is a lot easier. Carpet tends to collect sand over the years and it can be difficult cutting it from the top. This also keeps your blades sharper longer. Sometimes with the carpet being small like this you can put it out next to your garbage cans and they will haul it off. (sometimes they won't, they can be pretty picky).

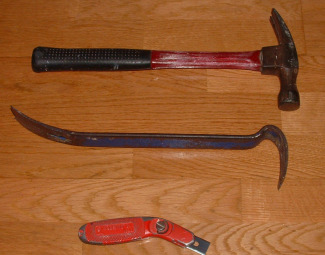
In this photo are the tools I use for the floor preparation part to remove the carpet and tackstrip. I find that a good size crowbar makes it a lot easier by giving you more leverage when removing the tackstrip. And I use a 20 oz. hammer which works better then say a 16 oz. hammer.
If there isn't any base board on the walls or it doesn't
matter if they get damaged (in the case that your going
to replace the baseboards) you can use what they call the club when removing the tackstrip.
Which is actually a garden tool. It also works good on
other flooring projects. I got mine at Home depot for about
$20.00 in photo below.

When removing tackstrip on concrete floors
I use my crowbar to just hit the nail in the tackstrip from
the side instead of trying to pry the nail up.
When you pry the nail up on concrete floors it tends to break
chunks of concrete which leaves little holes along your walls.
When I use the Club I just ram the tackstrip where each nail is and it knocks the nail loose from the concrete. Use gloves when handling the tackstrip those nails are sharp!
Removing tackstrip on wood floors can take a little longer then concrete floors. On the wood floors you have to pry each nail up.
Carpet Padding Removal
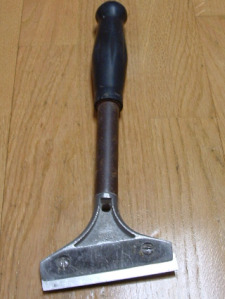
Concrete floors- Carpet padding shouldn't be too difficult to remove. Some carpet installers will glue the padding down. The glue is usually just around the perimeter of the room and sometimes where the pad joins together. I use a 4 inch scraper to get the glue off the floor. Here in this photo is a small 4 inch scraper I use. They also make the scrapers with the handles as long as 4 feet which helps to save your knees.
Wood floors- Carpet padding on wood floors can be a little more labor intensive, mostly from the carpet installers that use staples to hold the pad down. I pull the pad up as best I can, then I use my scraper like the one below in photo. I use the scraper to get the staples out of the floor, just make sure the blade in the scraper is dull so it will not dig into the wood floor. I found that this works a lot better then trying to pull each staple out one at a time.
While your scraping the staples, keep a look out for high spots or nails that are sticking up.

The Condition Of The Concrete Floor?
At this point with the concrete floor exposed you need to make sure the floor is somewhat flat. From my experience a flat concrete slab is rare. This can cause some floor preparation.
If there are humps in the floor you will have to either raise the area surrounding the hump or get rid of the hump. Manufacturers usually specify that if the surface varies by 1/4 inch within 6 feet that the flooring should not be installed on it.
BUT from what I have seen if every floor I ever laid had to be fixed within specs, I would have either made a lot of money (leveling a floor can get costly) or I wouldn't have done many jobs.
Laminate flooring can cover a lot of imperfections in the floors underneath, from my experience most of the humps or dips that will be hidden underneath the laminate flooring are not very noticeable. And often the problem areas may be in a part of the room that is covered with furniture, or where there is no traffic to speak of.

Dips
But in some cases when humps or dips are severe enough, they need to be addressed. The dips in the concrete floor can be filled in with a floor patch, which is a portland cement based product. You mix it with water and use a wide trowel to smooth it out level with the surrounding floor.
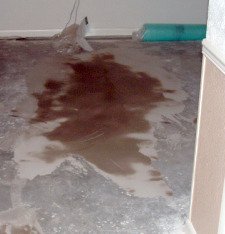
Here in this photo I had to fill in a dip in the concrete. It was 3/8 inch lower then the surrounding floor.
Humps
Humps are just the opposite from dips. If the hump is too high it will have to be taken down. With a concrete floor that may involve a hammer and chisel a grinder a concrete saw or a jack hammer. Anyway you look at it this type of floor preparation won't be any fun. It can be pretty messy too.
The times I had to grind a floor, I had to first attach a vacuum to my grinder then you need to tape off door ways with plastic sheathing to other rooms . Where a filter over your mouth and nose. The concrete dust is very fine and goes everywhere.
True Story
As I mentioned on the DIY installation page, there will be times when you run across that hidden problem you weren't expecting. Here's an example:
I started a job for a local flooring retailer in my area, His work order did not say anything about floor preparation.
They had added a room on the back of their home and the carpet flowed from the home into this new addition.
When they added the room they had to cut the concrete wall to make a 6 foot wide entry into the room. After I got the carpet up there was a hump all the way across the opening. There was no way I could install laminate over this hump. It had to come out. So I had to tape up plastic sheathing on each side of the opening which was only about 10 inches wide. Then I had to get between the plastic sheathing with a grinder and grind the floor down flush. After about 10 seconds of grinding I had to close my eyes the dust was so bad. I couldn't see anyway. I could only do this for about 3 to 4 mins at a time until I got it right. What a day.
Some More Floor Preparation, Scraping And Sweeping
Floor preparation can be pretty time consuming, hopefully there won't be any surprises that make this task any longer. After I finish with removing the carpet, tackstrip and padding I check the floor for any lumps of drywall mud or concrete lumps. I use my scraper and scrap everywhere. If you don't notice these and install the floor over them it can cause you extra work having to remove the flooring to get to it later.
Then I give the floor a good sweeping, check again for any debris. A little tip to find little nails or pebbles get down on the floor, put your ear against the floor and look across the room you can spot anything you missed. Hopefully this is all the floor preparation you will need to do.
Now that the floor preparation is complete, we will move on to the next stage.
Return to Home Page from Floor Preparation Page


