Installing the First Row of Laminate
When installing the first row of laminate flooring, I prefer to start on a wall that is as straight as possible. Usually an outside wall will be the best place to start . When starting the first row of laminate flooring, using spacers to maintain a gap will make it easier. Sometimes the little plastic spacers don't guarantee your laminate will stay put while your tapping the planks or trying to get the edges to click together . Sometimes if possible using spacers that act as wedges will help lock your floor in place so it will not shift around on you while your installing it. I use a Pergo clamp from the old days that allows me to adjust the gap, and also use the clamps at each end to tighten up against each other. This is very affective when wanting the floor to not shift.
If you don't have a way to lock the floor in, just keep an eye on your gap around the edges as you proceed.
Click On Photos To Enlarge
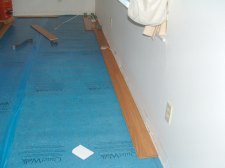
First thing I do is to lay a row of planks along the wall making sure all the ends are connected evenly. Sometimes a second row connected to the first row will help it stay straight. You need to know what the thickness of the base board or quarter round is to determine how big the gap will be between the laminate and the wall. (always remember to leave a gap between the flooring and the wall for expansion and contraction)
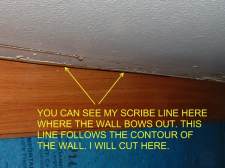
Most of the time when installing the first row of laminate, it is not going to be perfectly straight along the wall. What needs to be done if thats the case is to scribe along the wall and cut the laminate so it will follow the contour of the wall. Here in this photo you can see where I have scribed along the wall. I will cut along this line with a jig saw or table saw.
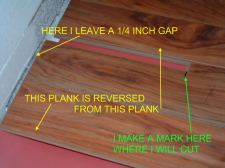
One of the easiest ways to cut the last plank in the row when you reach the end, other than to measure it with a measuring tape. Is to first make sure your first row has the correct gap where the first row starts, which is usually 1/4 inch. Then take a full plank and spin it so it is reversed in relation to the floor your installing. Lay it at the end of the row up to the wall leaving a 1/4 inch space. Then mark the plank where the last plank installed ends. As shown in this photo.
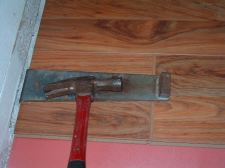
After I make the cut I can tap the board in place with a pull bar and hammer. This particular product (Lamton) allows the planks to be joined together laying flat as I tap them. Some locking systems will not work if you try to tap them together in this manner.
Return to DIY Installation Page From Installing The First Row of Laminate Page


